CONDITIONS
Given a compass and a designated point on the ground.
STANDARDS
Determine the correct magnetic azimuth to the designated point within 3 degrees using the compass-to-cheek method, or within 10 degrees using the center-hold method.
TRAINING AND EVALUATION
Training Information Outline
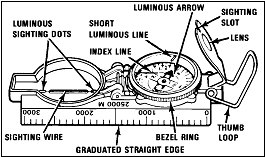
1. Read your compass (Figures 5-25 and 5-26).
a. The floating dial is used to determine the direction in which you are pointing your compass.
b. The outer, “black” ring of numbers and tick marks is used for finding direction in mils.
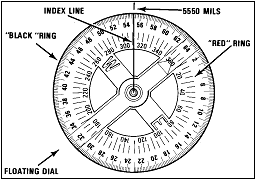
c. The inner, “red” ring of numbers and tick marks is used for finding direction in degrees.
(1) There are 360 degrees or 6,400 mils in a circle. These are marked with a tick mark every 5 degrees and 20 mils. However, not every tick mark is numbered. You will have to determine the number for these lines using the numbers that are shown.
(2) To read direction, point the compass in the direction you want to go or want to determine.
(3) Look beneath the index line on the outer glass cover and estimate to the nearest degree or 10 mils the position of the index line over the (red or black) scale.
(4) Be careful to hold the compass still so that the dial remains stationary while you are reading the scale.
(5) In Figure 5-26, the readings are 312 degrees (red scale) and 5,500 mils (black scale).
(6) If you understand these readings and can apply either of the holding and sighting techniques of shooting an azimuth, you will be proficient in performing this task.
2. Shoot an azimuth.
a. Use your compass to determine or follow an azimuth. The arrow on the compass points toward magnetic north. The arrow is also attracted by any mass of metal-a truck, your rifle, your helmet, and even electrical power lines. Thus, be sure you use your compass away from metal objects so it will not give a wrong reading.
b. The lensatic compass must always be held level and firm when sighting on an object and reading an azimuth.
c. There are two methods of holding the lensatic compass and sighting.
(1) Compass-to-cheek method (Figure 5-27). To use this method-
(a) Open the cover to a 90-degree angle to the base. Position the eyepiece at a 45-degree angle to the base.
(b) Place your thumb through the thumb loop, form a steady base with your third and fourth fingers, and extend your index finger along the side of the compass base.
(c) Place the hand holding the compass into the palm of the other hand.
Figure 5-27. Compass-to-cheek method.
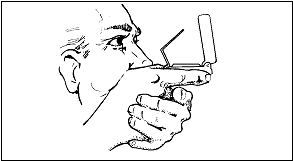
(d) Bring both hands up to the face and position the thumb that is through the thumb loop against the cheekbone.
(e) Look through the lens of the eyepiece. If the dial is not in focus, move the eyepiece up or down until the dial is in focus.
(f) Align the sighting slot of the eyepiece with the sighting wire in the cover on the point to which the azimuth is being determined. Look through the lens of the eyepiece and read the azimuth under the index line.
(2) Center-hold method (Figure 5-28). Use this method only when a precise direction is not required:
(a) Open the compass so that the cover forms a straight edge with the base. The lens of the compass is moved out of the way.
Figure 5-28. Center-hold method.
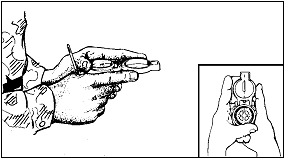
(b) Place your thumb through the thumb loop, form a steady base with your third and fourth fingers, and extend your index finger along the side of the compass.
(c) Place the thumb of the other hand between the eyepiece and the lens, extend the index finger along the remaining side of the compass, wrap the remaining fingers around the fingers of the other hand, and pull your elbows firmly into your sides. This will place the compass between your chin and your belt.
(d) To measure an azimuth, turn your entire body toward the object and point the compass cover directly at the object. Look down and read the azimuth from beneath the fixed black index line. This method can be used at night.
(e) To keep from going in circles when you are land navigating, stop occasionally to check the azimuth along which you are moving. Also, you can move from object to object along your path by shooting an azimuth to each object and then moving to that object. Repeating this process while you navigate should keep you straight.
Evaluation Guide:
Determine a Magnetic Azimuth
Performance Measures
1. Determine a magnetic Azimuth using a lensatic compass.
2. Use the compass-to-cheek method to within three degrees of a designated point.
3. Use the center-hold method within 10 degrees to a designated point.